Engineering for Success with Aluminum Extrusions: Five Tips to Use Dimensioning and Tolerance in the Design Stage as a Competitive Advantage
In today’s fast-paced manufacturing industry, it can be difficult to set aside time to define tolerances for a new aluminum extruded component design. Pressed for time, OEM design engineers often default to title block tolerances. This might save a little time, but it risks adding unnecessary cost to the part due to poor fit and function.
On the other hand, a print filled with too many tight tolerances may cause extruders to not quote the part or excessively price a part that has tighter tolerances than needed for its function.
Below are five tips to help manufacturers successfully engineer proper dimensioning and tolerance when designing aluminum components. These tips can help achieve optimal manufacturability and keep costs competitive.
1. Choose the critical dimensions.
Adding tight tolerances on non-critical dimensions is a major source of hidden costs. Many times manufacturers will include tighter tolerances that do not affect the form, fit or function of the final product. These tight tolerance features can result in requests for print deviations, longer setups, reruns, costly die trials, unnecessary tooling alterations—all of which can lead to costly, late or rush deliveries, and ultimately price increases. Manufacturers can reduce those costs by identifying only the critical product dimensions, which can then reduce setup and inspection time. Some dimensions may not require tolerances at all—just a visual inspection to ensure a part has its intended shape.
2. Understand which tolerances are achievable.
Once manufacturers have identified the most critical product dimensions, their next step is to understand which tolerances are achievable based on the specific manufacturing process. Tolerances are affected by multiple extrusion factors, including press size, billet temperature, extrusion speed, die shape and type, cooling time, amount of post-stretch, air temperature, and multiple die copies, just to name a few. This is why having discussions with your aluminum extruder in the design/quoting stage to agree on tight tolerance features is important.
To help manufacturers, the Aluminum Association has developed industry standard tolerances for extruded products. These tolerances try to encompass most of the variables in the extrusion process. While you should use the Standards Book as a guide, know that it cannot cover every possibility of design creation. Having discussions with your extrduer in the design/quoting stage is key to mutual tolerance agreement and establishing tolerance hierarchy.
Manufacturers can use these standards – as well as the information showing how differences in features or size can affect tolerances – as a reference guide when designing a product. Some extruders can hold tighter tolerances than the standards—another good reason to discuss tolerances with the extruder beforehand.
3. Establish critical dimensional product measurement (CpK) values, if necessary.
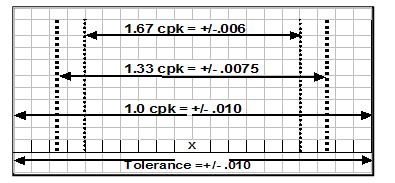
Establishing the CpK value to be used is a critical element in determining capability of dimensional tolerances. Some CPK requirements will necessitate a capability study to determine the extent to which the extrusion process can meet specified dimensions. Although this is an added cost it will allow the extruder to understand process capability and repeatability. For example, a 1.33 CpK requirement, in effect, reduces the tolerance band to 75 percent. Likewise, requiring a 1.67 CpK reduces the tolerance band to 60 percent.
It is important to verify the extruder’s ability to control their processes to attain specified CpK values. This can eliminate many future complications when the product goes into production. Exhibit #1.

4. Understand Geometric Tolerancing.
Geometric Dimensioning and Tolerancing (GD&T) is becoming the internationally recognized language of the manufacturing world. GD&T is being used more often on customer prints throughout industries globally.
For more complex component extrusions, geometric tolerancing may be necessary to maintain precise shapes and forms.
When discussing flatness of the whole surface, as defined with geometrics, make sure that your extruder understands the difference between GD&T “flatness” and “straightness” compared to traditional standard extrusion terminology of “flatness” and “straightness”. General flatness of an extrusion in standard extrusion terminology refers to the cross-sectional flatness of the profile and straightness refers to the bow in the length of the part.
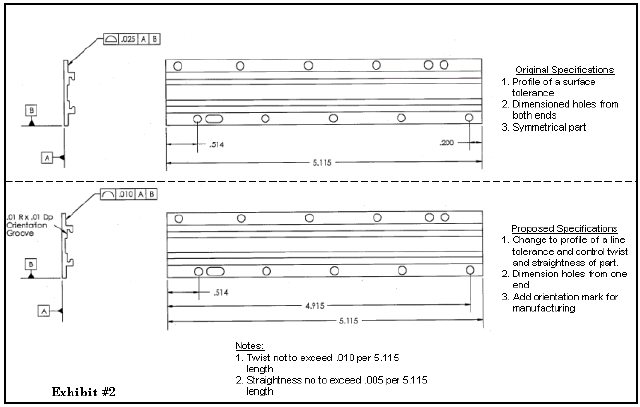
Some geometric tolerances, such as the profile of a surface, can lead to increased inspection time and add significant cost to the part. A best practice is to use the profile of a line on the cross-sectional profile as well as noting twist and straightness to achieve the desired profile of a surface (Exhibit #2). This allows the extruder to verify the extrusion prior to machining to ensure its functionality.
Another point pertaining to Figure #2, is the use of symmetric ID grooves. When designing a symmetrical shape, add an identification mark to allow proper orientation. This reduces tolerance variance that is characteristic in the extrusion process. Exhibit #2.

5. Design for both functionality and manufacturability.
Designing tight tolerance features without taking into account manufacturability, can increase costs and frustration.Take for instance a part that has an acceptable saw cut tolerances, but machined features and their tolerances are set from both ends of the part. This could cause you to have to add milling processes, multi clamping, or touch probing operations, that can add costs.
Keep the dimensioning format as simple as possible by using the traditional primary, secondary and tertiary datums whenever possible. This can help reduce process variation and keep costs down by reducing excess machining operations, re-clamping and handling operations.
These five dimensioning and tolerance tips offer manufacturers an alternative to defaulting to block tolerances. By partnering with your extruder early in the design process, manufacturers can productively design for both function and manufacturing goals, and improve their organization’s competitiveness.
